Load Balancing A WordPress Site
Setting up your site on multiple servers behind a load balancer will provide flexibility as well as help make for more performant experience for visitors.
Configuring a server cluster for your WordPress site is very doable with Cleavr. However, please be aware that WordPress isn't the most straightforward of apps to set up with Load Balancing and there will likely be some extra, often duplicate work, when keeping WordPress app servers in sync.
This guide presents two methods to set up your WordPress site with load balancing.
The first is a more traditional, direct method, and we'll cover the following:
- Setting up two app servers that will run WordPress
- Setting up a separate database server that the two app servers will connect to
- Setting up a content delivery system that will store media
- How to manually keep server files in sync, mainly regarding plugin maintenance
For the second method, we'll look at WordPlate, which will be a more comfortable method for developers used to working locally and deploying using Cleavr's deployment workflow feature from a Version Control system (GitHub, Bitbucket, GitLab). It will also help reduce duplicate tasks to maintain app servers.
Method one - traditional set up
Let's first walk through a more typical way of setting up a WordPress server cluster behind a load balancer.
Provision servers and add sites / database
App Servers
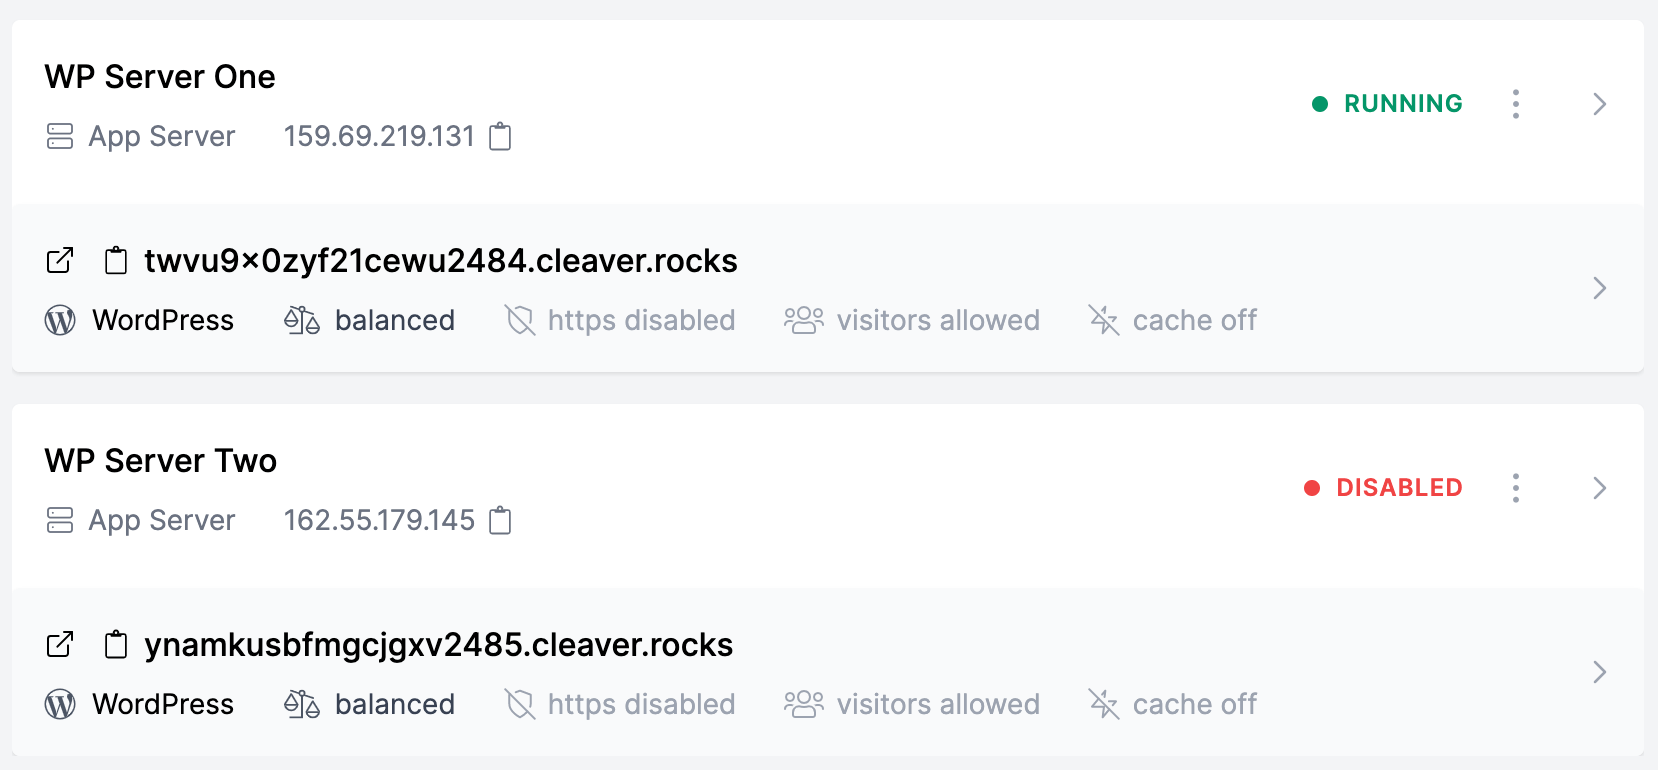
Provision two app servers in Cleavr. When adding the new server, for the Server Type selection, choose WordPress Optimized Server - though, you can also select the regular App Server option.

After the servers complete provisioning, add a WordPress site to each of the servers. You can use whatever domain you'd like, including a free Cleavr test domain. Do not enable SSL for the site on the App Server. SSL will set at the Load Balancer level.
Note that this will also prompt a database to be installed on the server. However, you can remove and disable the database and database server on the servers if you'd like as we'll be updating the WordPress sites to connect to an external database server.
Do not perform the initial setup for your WordPress site at this time. We'll do this after we update the WordPress sites on each server to connect to the external database server.
Load Balancer
Provision a load balancer, making sure that you select the Load Balancer server type option.

Let the Load Balancer provision and move on to the next steps. We'll come back and configure the Load Balancer later.
Database Server
Lastly, provision a Database Server. Select Database Optimized Server for the server type option and then select which database type option (MySQL or MariaDB) that you want to run on the server.

Once the database server finishes provisioning, add a database.
When creating a new database, be sure that you set Host to either the IPs of the servers that will be connecting to the database server, or simply add
% to allow connections from any requesting server.
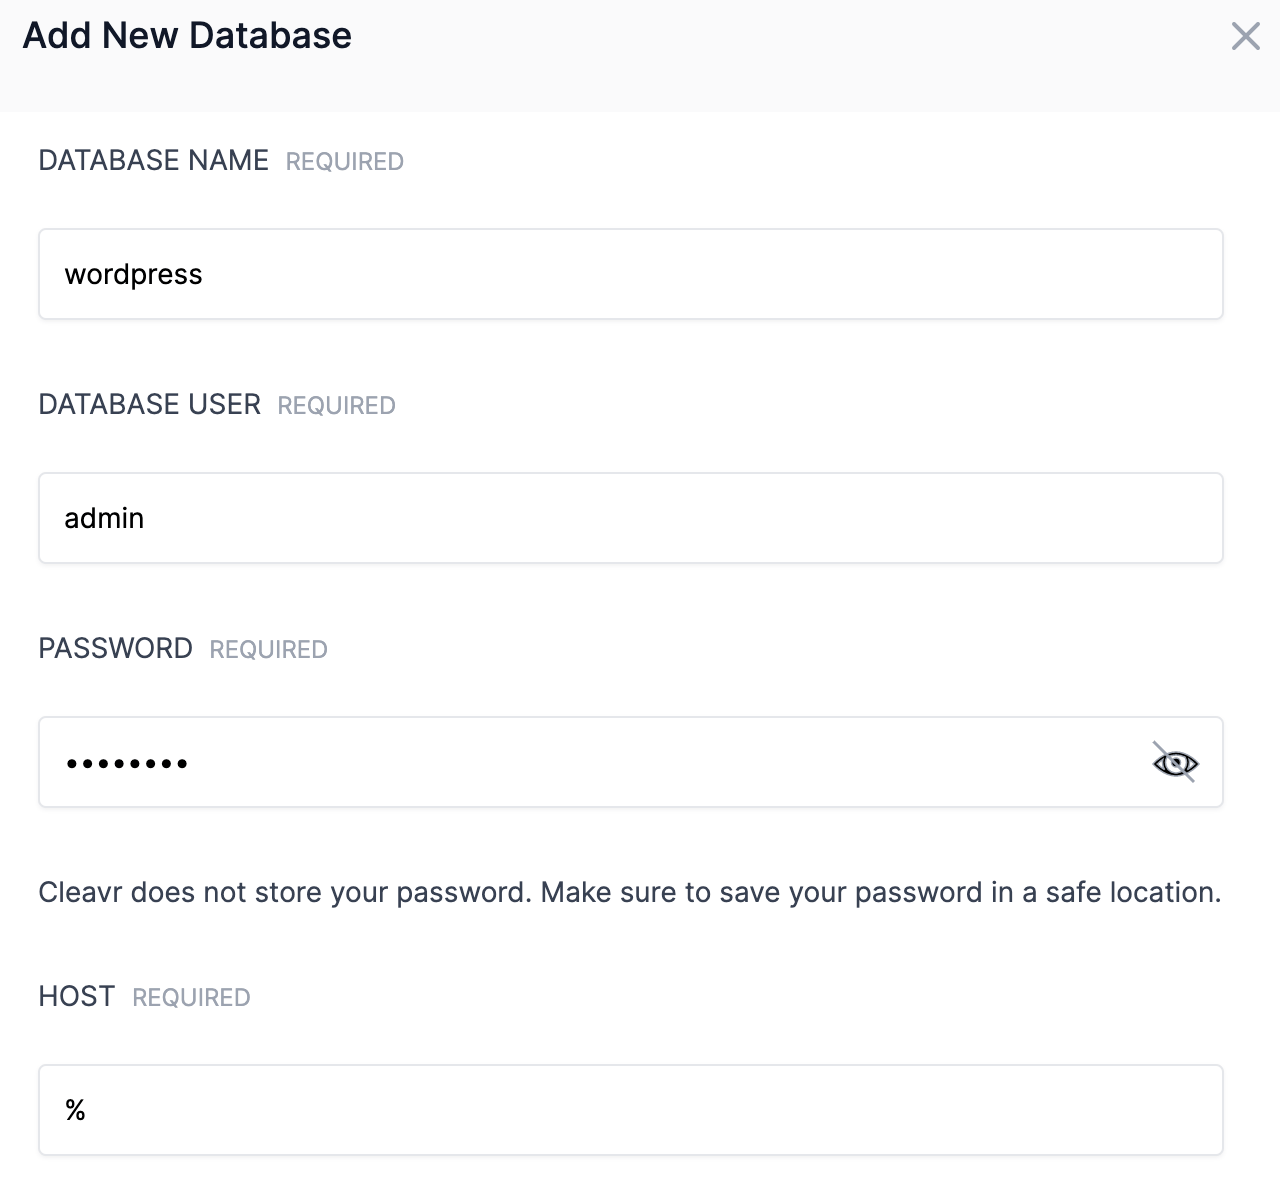
Host will need to be set to allow the App Servers to connect, do not leave it as localhost as this will deny the app servers from connecting.
Connect App Servers to Database Server
Start with one of the App Servers. You will need to connect to the server via an SSH / SFTP method.
Refer to the following guides on how to access the servers:
On the first App server, go the to /current directory for the WordPress site.
It will be located similar to the following:
/home/<server user - ex. cleavr>/<site name>/current
Edit the wp-config.php file and update the database connection variables.
define('DB_NAME', 'database-name');
define('DB_USER', 'user-name');
define('DB_PASSWORD', 'password');
define('DB_HOST', 'server-public-ip');
Be sure to update the above variables with your db name, user, password, and public IP address.
Save the file and then copy the file from your first app server and paste over to the corresponding location in the second app server.
Your WordPress sites on both servers are now connected to your external database server!
Set up Load Balancer Site and connect App Servers
Head over to the Load Balancer server and add a load balancing site. Select WordPress for the app type.
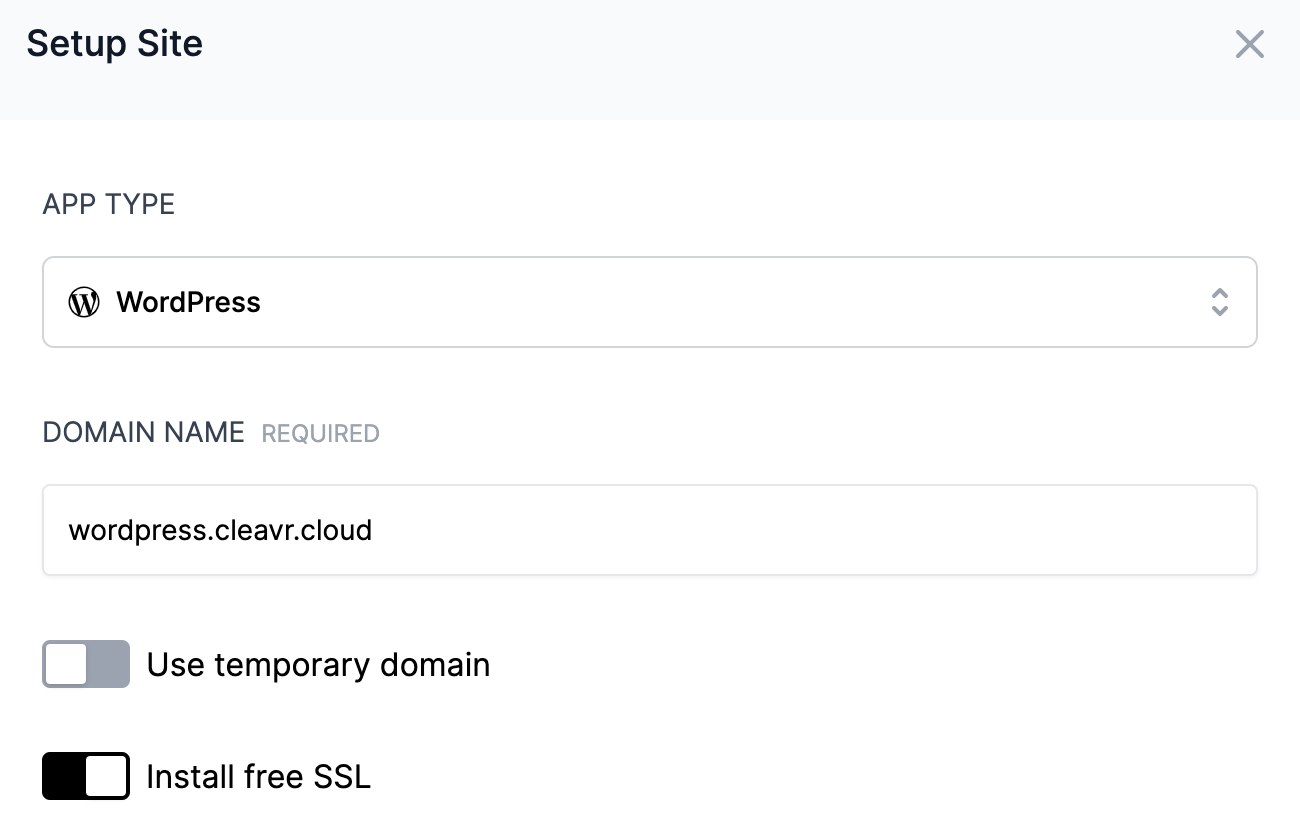
This is where you'll want to enter the actual domain that will be used for the site as well as applying SSL.
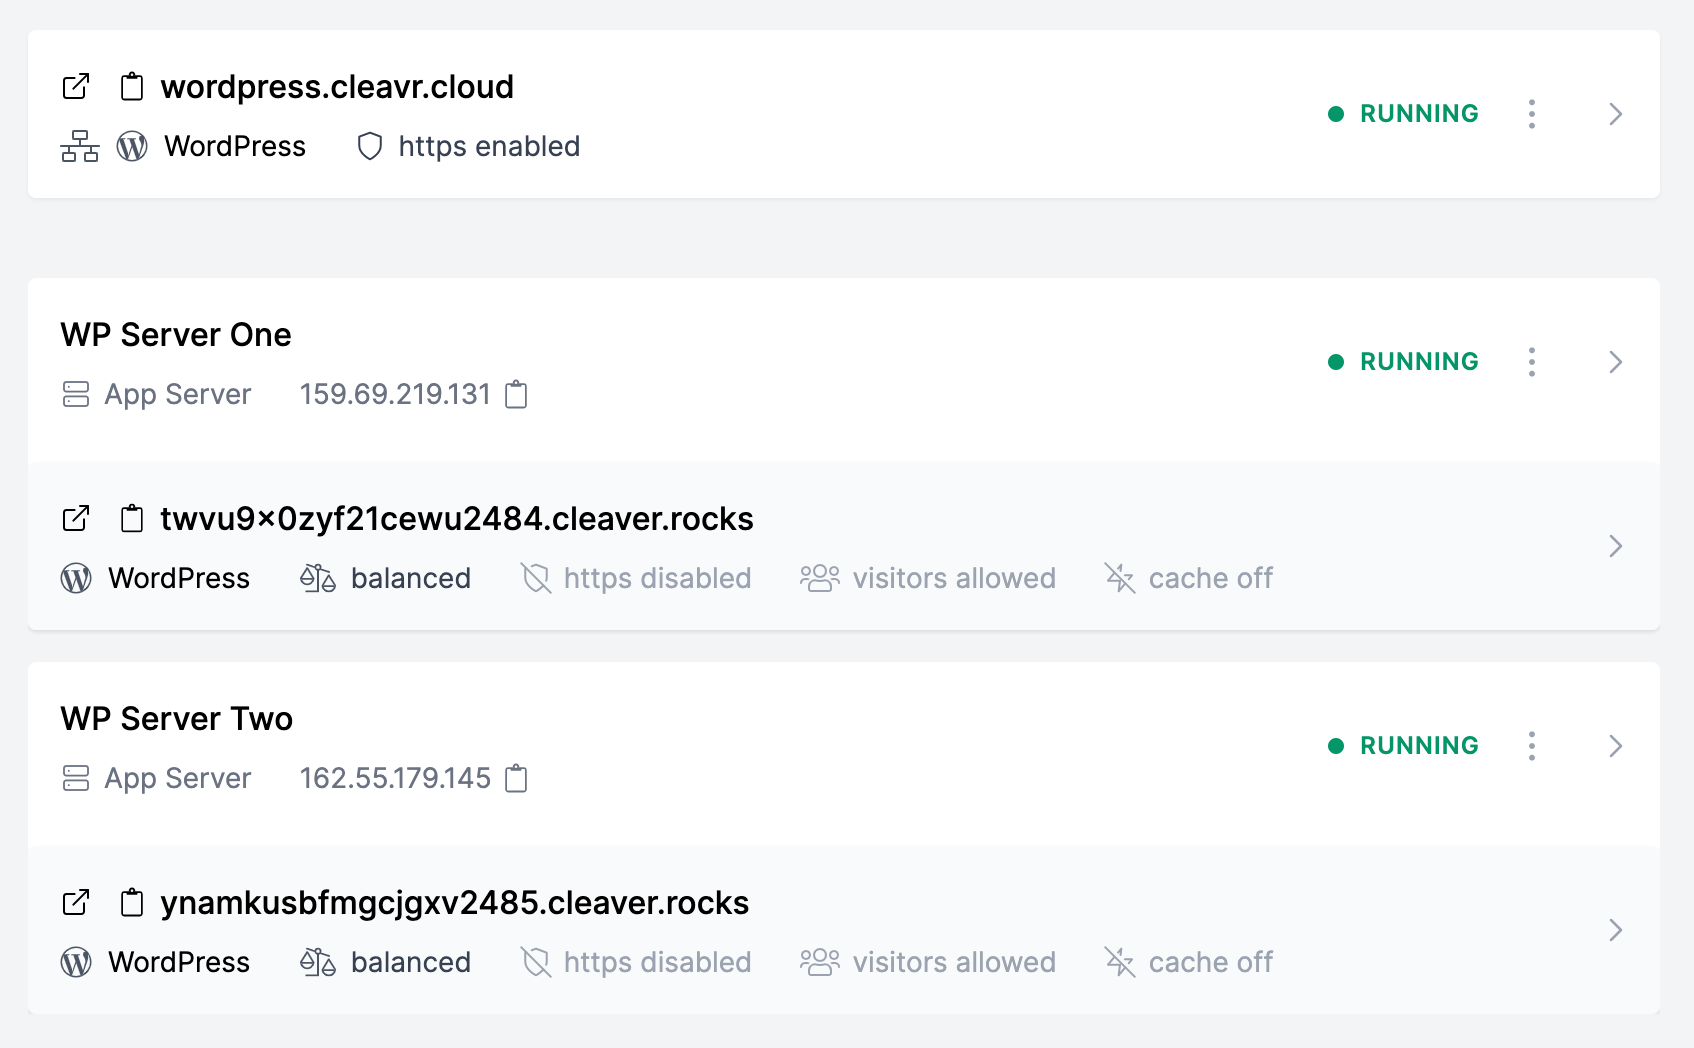
Once the site has been added, link the servers to the load balancer.
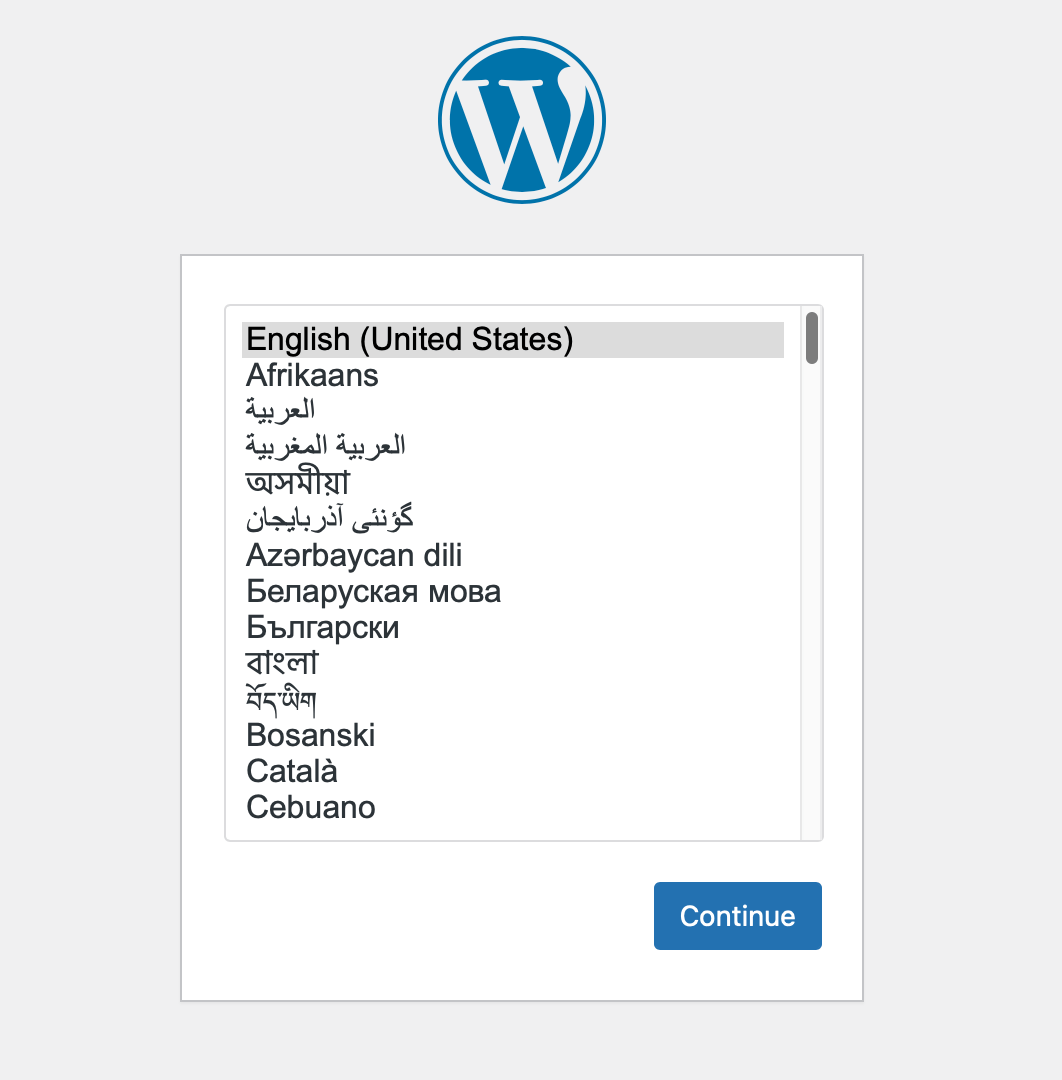
Perform Initial WordPress setup
Visit the Load Balancer Site domain. This should present the initial WordPress setup screen. Perform the initial setup. This will update your database on the external database server.
Now, you can go about setting up your WordPress site!
Tips
There are a couple of tips to present since you'll want to make it easier to manage separate WordPress instances and try to keep them in sync as much as possible.
Set up a Content Delivery Network / Central File Storage
To keep content in sync between the different servers, we suggest using a CDN type solution. This way, you don't have to worry about keeping media storage in sync between your two servers and can make use of powerful data storage solutions to store and server media assets instead.
There are many WordPress plugins that can assist with this.
We've tested the following (though there are plenty more to choose from):
- WP-Stateless - connects to your Google Cloud account and stores / serves uploaded content to and from Google Cloud
- Media Cloud - similar to Stateless but includes integrations with AWS S3, Wasabi, and DO Spaces
For whichever solution you choose, you will need to install the plugins and upgrade them on each app server individually. See the following tip for further instruction.
Adding and maintaining plugins
One of the big things to keep in mind is that you will need to add and maintain plugins on all app servers individually. You can either do this by copying the files from one server to the other to keep them in sync. Or, you can connect to the admin page on each server individually.
To do this, go to the Load Balancer server and click Disable for all but one app server. This will ensure that you are accessing only the admin section for the enabled server.
Log into the WordPress admin page, add / update plugins, and then disable the server and enable the next server in line. Then, repeat.
Method two - use WordPlate, or a comparable solution
A huge benefit to using WordPlate is that you can avoid some of the redundant work to update plugins across all servers.
With WordPlate, you can update WordPress locally on your device, and then deploy the finished product out using the deployment workflow deployment method in Cleavr.
Another benefit of WordPlate is that you can benefit from some of the enhancements and more modern development methods that they've introduced. Such as, you can
make use of a .env file to maintain environment variables, such as database connections.
Install WordPlate
The first step in to install WordPlate on your local device.
Follow the WordPlate instructions on their README file to get going.
Once installed, build your WordPress site on your local environment and continue on to the following instructions when ready to deploy.
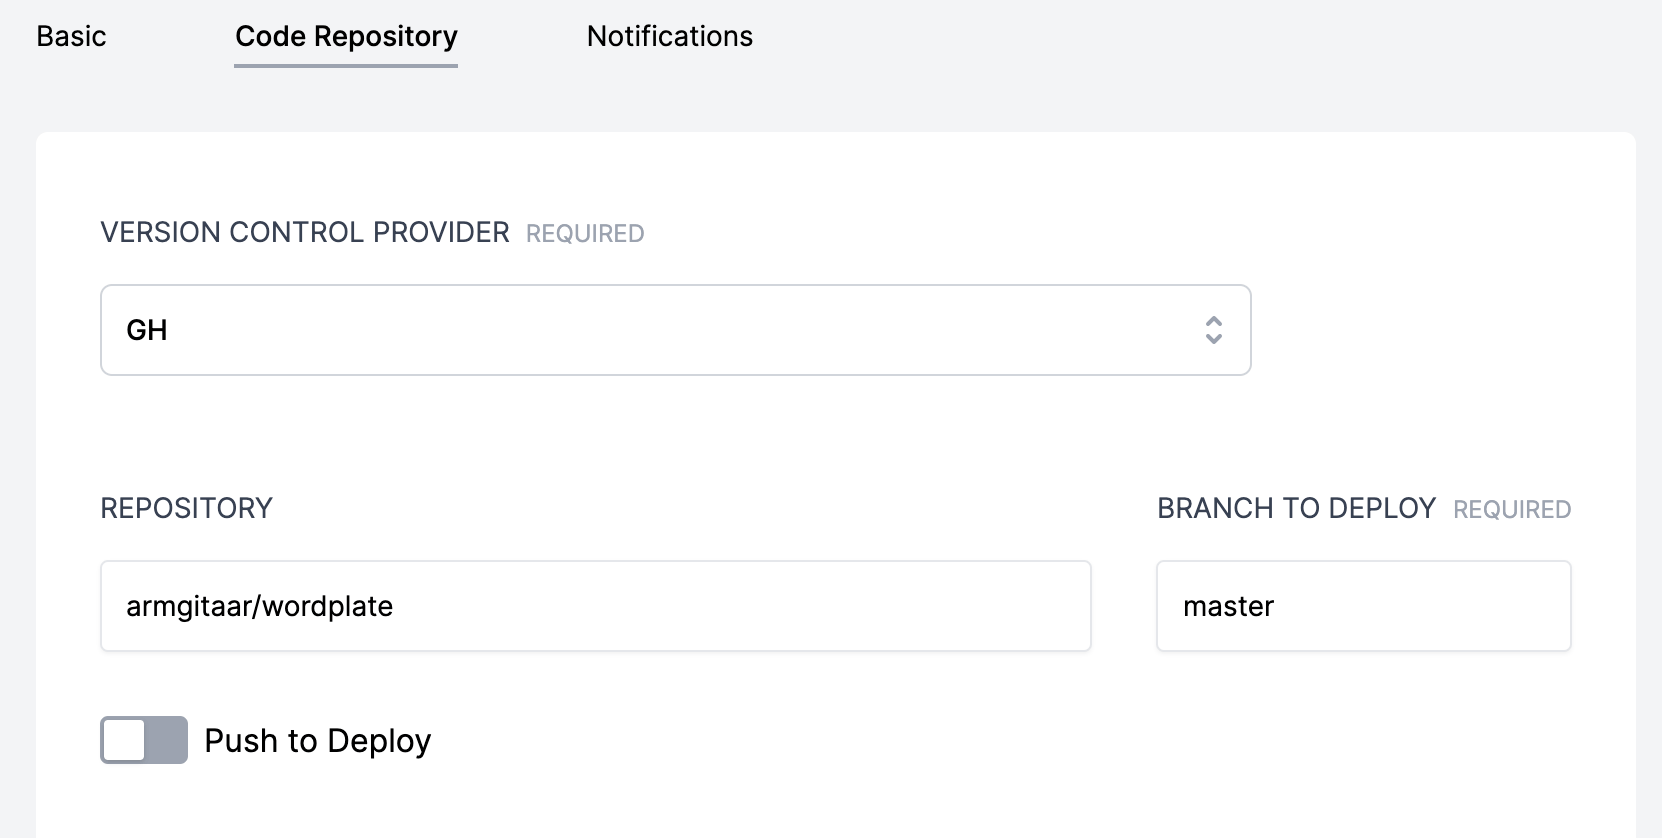
Commit your code to a Version Control repository
Add your code to GitHub, Bitbucket, or GitLab.
Add servers, sites, and database
Follow the steps from Method One to provision app servers, database server, and load balancing server.
However, instead of adding WordPress app types, select PHP for the site app type instead.
Also, when adding PHP sites, you'll want to expand Advanced Options and then enter public for the Web Directory.

You also don't need to worry about updating database connection variables in the same way as method one. We'll make the connections in the environment file when we set up the deployment workflow.
Add Load Balancing Site and connect servers
Add a Load Balancing site and select the PHP app type.
Then, connect the app servers to the load balancer.
Configure deployment workflow code repository
Navigate to the deployment workflow section. You'll notice that a new deployment workflow has been added after adding the load balancing site. This is the master deployment workflow that we'll configure to deploy the WordPlate site to the app servers.
Click into the wbe app, then go to Settings > Code Repository and select the VC Provider for where your code is and then enter the Repository and Branch To Deploy info.
Add environment variables
On the Environment tab, add in the .env variables.
They should look something like the following.
WP_ENV=production
WP_DEBUG=false
WP_THEME=wordplate
WP_PREFIX=wp_

DB_HOST=<db public ip>
DB_NAME=<database name>
DB_USER=<database user>
DB_PASSWORD=<database password>

# https://wordplate.github.io/salt/
AUTH_KEY=ded006be9d2b242c4df043608b399f5537c8da79916a21ae8c23a2e4156e3799
SECURE_AUTH_KEY=b1e61db85cfafa226f70abba8cfcac70c1bbcf07cc7c82f7d718c1eb4bf5ae2b
LOGGED_IN_KEY=fdc6684804ac7b72ec485c7588dd78f9989950a935ae2a35a6d750285314f78f
NONCE_KEY=676ae2e9befe1b22822bd973bcf7c1c3f4748fe6d272ea2667146832484bdff2
AUTH_SALT=54f005e47227616aa6daf26a2fd4db97b71f6a570022ed7383383bd7d225eb42
SECURE_AUTH_SALT=07f46a835f5caa39007de9c65e1f3a2c8fdd81c8164a2be61bb5312c68305180
LOGGED_IN_SALT=e5035645134537babf04473773108a056513c51c99281c7da80752633a63d409
NONCE_SALT=c99c4ecae2a722fa70fccb918cc5757327bc9e5897ed42c7eb4852bbd37a5bd3
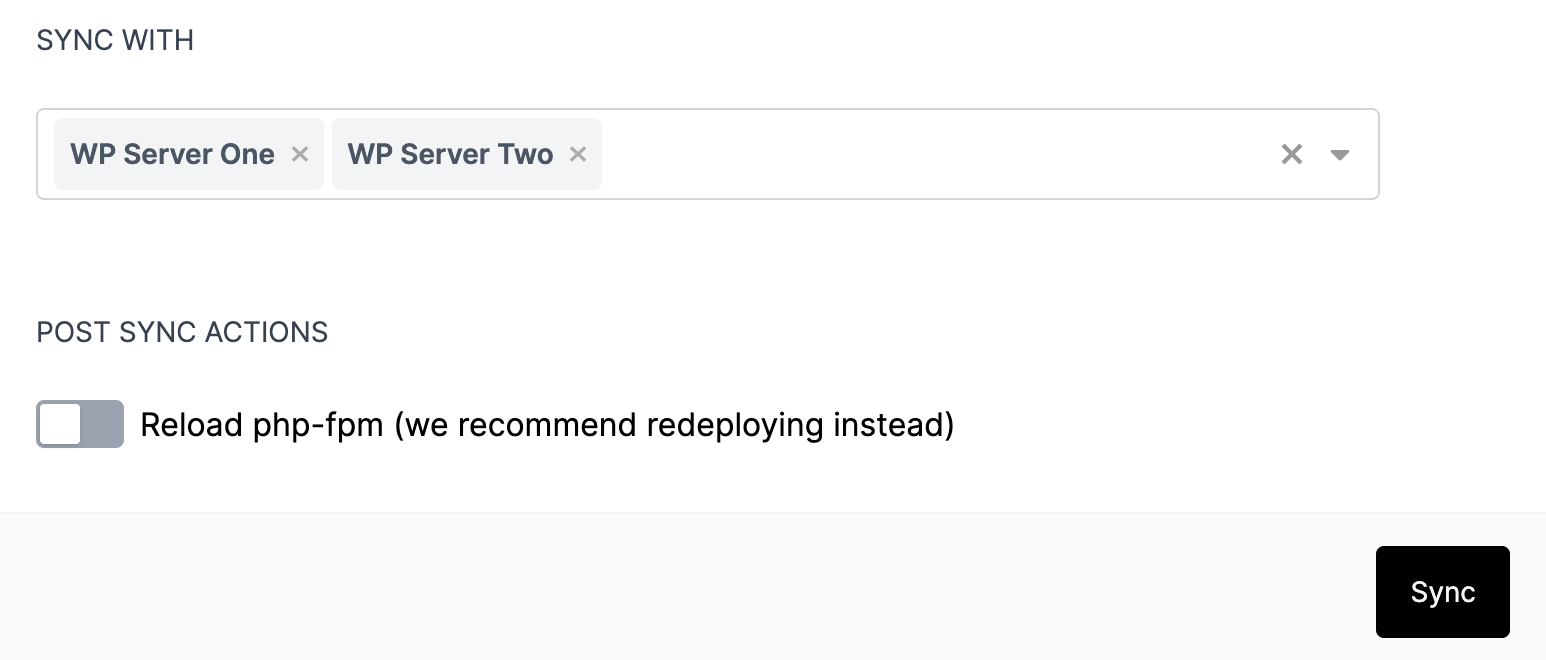
At the bottom of the Environment page, select both app servers to sync the .env variables to.
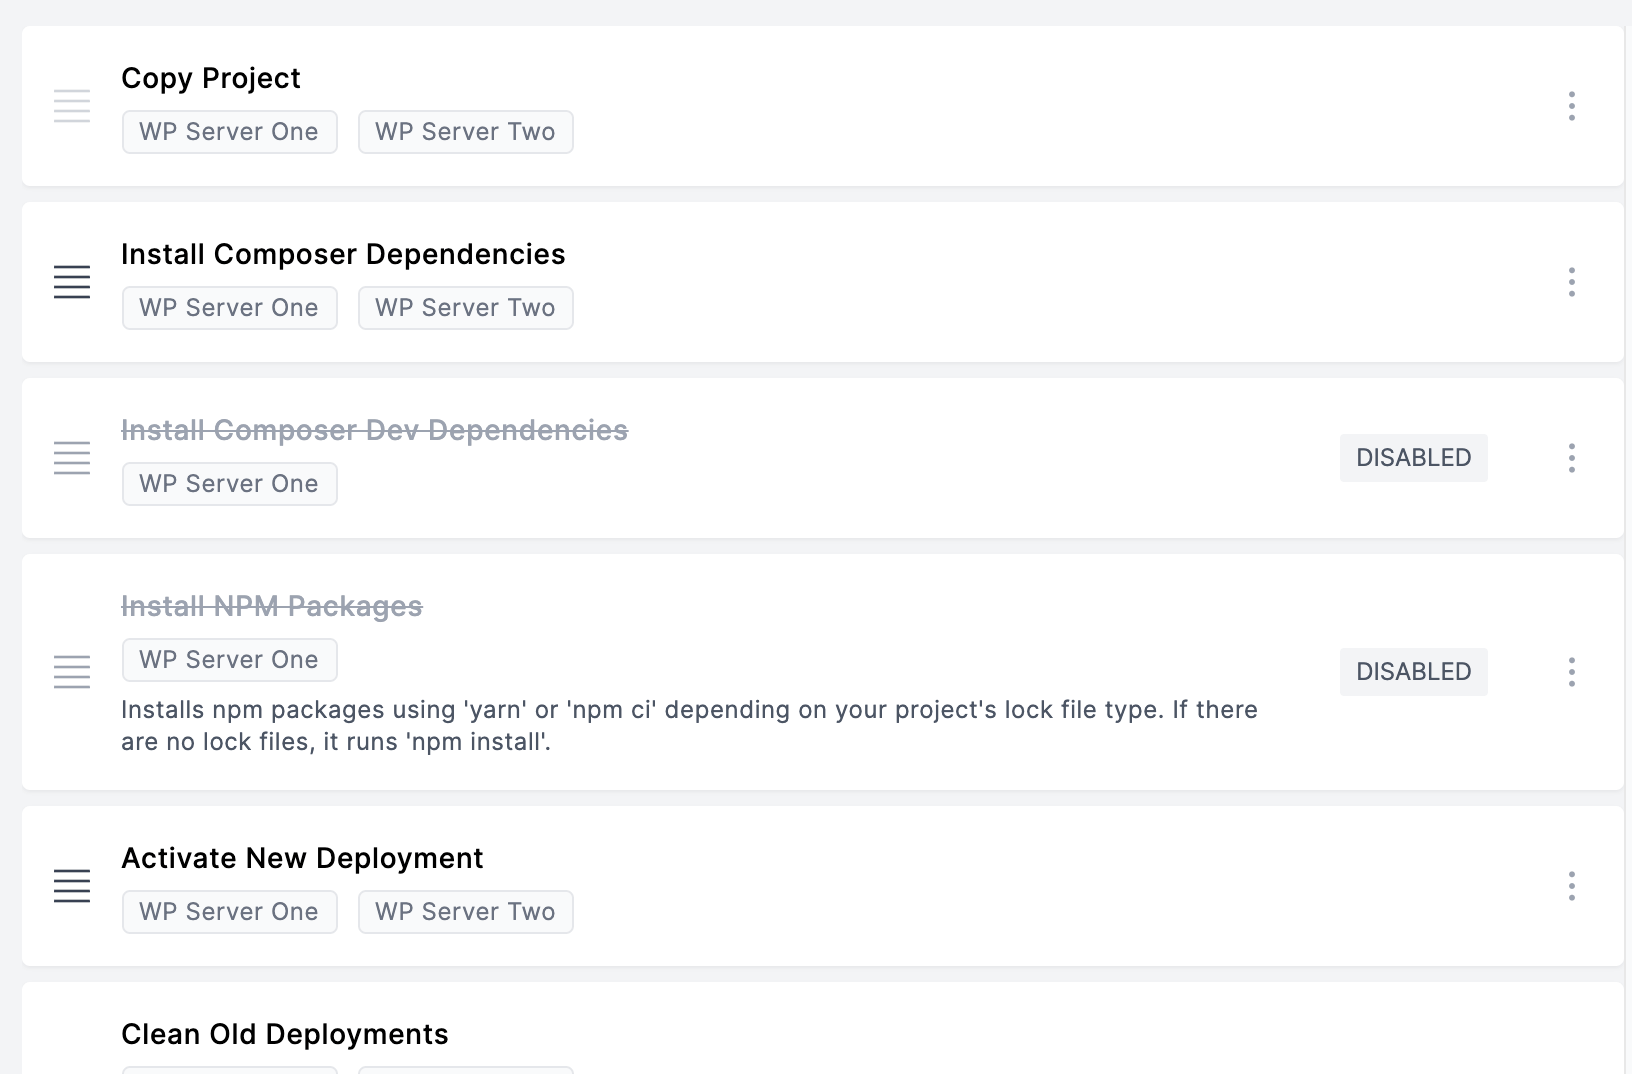
Verify deployment hooks
Go to the Deployment Hooks section and verify each active step will operate on both of the app servers. If not, edit the hook and add the missing server.
Also, enable Install Composer Dependencies hook.
Deploy! 🚀
You can now deploy the Load Balancer Web App!