Deploy a Next JS app
Next.js is a React/JavaScript framework used for developing SSR and static websites.
Cleavr deploys Next JS applications to your virtual private servers with minimal configurations required.
In this guide, we'll provide two examples for deploying Next apps. The first example will walk through deploying a standard setup and the second example will show how to deploy using Next's Custom Server settings.
Example 1: Standard Next App
Add a NodeJS SSR site
On an existing server, click Add Site to add a new site to your server.
Make sure to select the following configuration options:
- App Type: NodeJS SSR
- Entry Point: npm
- Arguments: start
- Artifact folder: .next
- Port Number: 3000
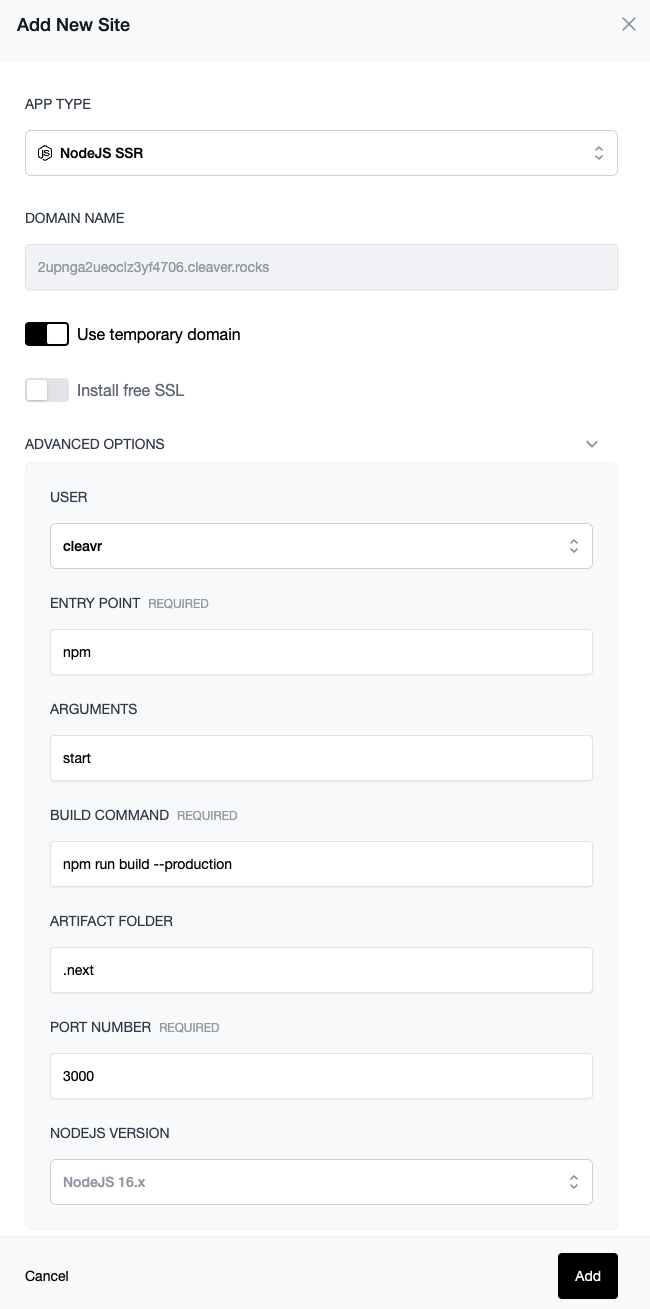
Select Add to add the new site to your server.
Port Number
Next defaults to port 3000 and so you will either need to explicitly configure the site to point to port 3000 as in the above step, or you can modify your code to accept a random port, process.env.PORT, assigned by Cleavr.
Add a Deployment Workflow
After the site has successfully installed, you'll now need to create a deployment workflow and deploy out your application.
In the deployment workflow section, you'll notice that a new deployment workflow was automatically created after the NodeJS site was created. This is a basic deployment workflow shell that you can use to complete the setup of your deployment workflow. Click on Complete Setup on the deployment workflow.
Configure the VC Provider, Repository, and Branch To Deploy fields on the Settings > Code Repository tab and then click Update.
You may need to update the entry point, arguments, build command, and/or cwd path fields based on your package.json file settings.
Deploy!
If everything looks good, go to the deployments section and deploy! 🚀
Example 2: Using Custom Server
Next is built for Vercel, the maintainers of the Next.js framework. So, it's not surprising that they build Next.js with deployments over Vercel in mind. However, they do allow customization and provide an example of how to setup a custom server on their docs site.
The below example deploys the custom server example. Refer to the ReadMe file to clone the example to your local and then add to your preferred code repository.
Add a NodeJS SSR site
On an existing server, click Add Site to add a new site to your server.
Select the NodeJS SSR option and enter the remainder site details and click Add to create the new site on your server.
Cleavr will automatically install NodeJS on your server if NodeJS has not already been installed.
Add a Deployment Workflow
After the site has successfully installed, you'll now need to create a deployment workflow and deploy out your application.
In the deployment workflow section, you'll notice that a new deployment workflow was automatically created after the NodeJS site was created. This is a basic deployment workflow shell that you can use to complete the setup of your deployment workflow. Click on Complete Setup on the deployment workflow.
Configure the VC Provider, Repository, and Branch To Deploy fields on the Settings > Code Repository tab and then click Update.
Next, on the NPM Build tab, add the following:
- Entry Point: server.js
- Build Command: npm run build --production Click Update.
Deploy!
If everything looks good, go to the deployments section and deploy! 🚀