Deploy Umami Analytics
Umami is a simple website analytics platform that you can install on your server and take control of usage data across your web properties.
Umami uses the Next.js framework and is easy to deploy to your server using Cleavr without deviating much from their instructions on their readme file on GitHub.
Step 1: Add New SSR App
On a new server, add a new site, selecting Node JS SSR as the app type.
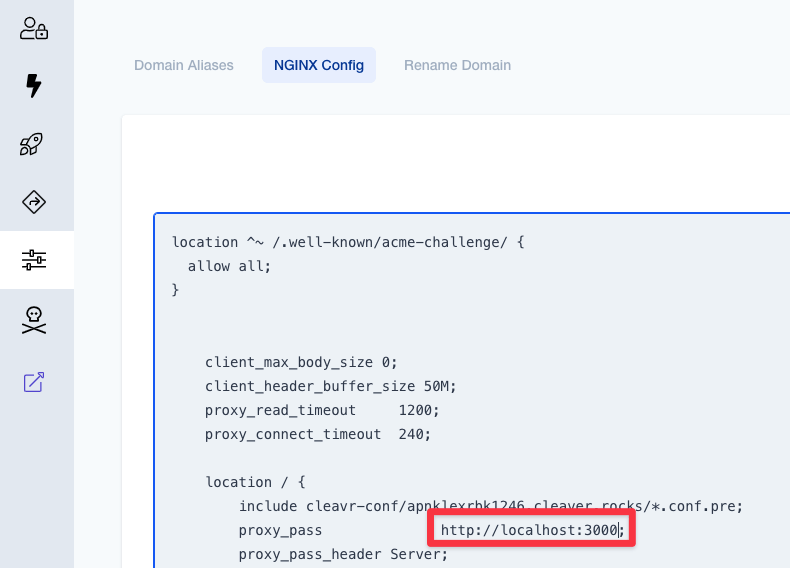
Once the site has been successfully added, go to the site's settings and click the NGINX Config tab.
Since Umami is configured to run on port 3000, we'll need to update the proxy_pass setting to reflect that.
Find the proxy_pass setting and set the port number to 3000.
Note that the port number for the app when you look at the site details will continue to display as the port number Cleavr automatically assigned. This won't impact deploying Umami.
Click Update
Step 2: Add A database
On the same server you added the site, click on the database section to install a new MySQL (or optionally Postgres) database.
Once the database server is installed, add a new database. Remember the database name and database user credentials.
Step 3: Configure Deployment Workflow
In the deployment workflow section, select Complete Setup for the deployment workflow that was created for the site created earlier.
Enter repository
Option 1 - quick and simple but with no automatic updates
On the Code Repository tab, enter the following:
Version Control Provider: GitHub
Repository: umami-software/umami
Branch: master
Click Update.
Option 2 - automatic updates
Before making the settings in the Code Repository tab, open antoher browser tab and login to github. Clone the repository https://github.com/umami-software/umami.
Back in cleavr.io:
On the Code Repository tab, enter the following:
Version Control Provider: Your GitHub Profile
Repository: <your-github-profile-name>/umami
Branch: master
turn on Deploy on Code Push to master
Click Update.
We will add a github action to automatically sync the umami-software/umami repository with your fork at the end.
If you don't want to have the updates automated, ignore Step 5. Then you can alternatively trigger the cleavr.io deploment by syncing your fork in github manually.
You will need a GitHub VC provider account created for this step.
Add env variables
Click on the Environments section and add in the following environment variables:
DATABASE_URL=mysql://<db username>:<db password>@localhost:3306/<db name>
HASH_SALT=<some random string of characters>
Replace the <> pieces above with the appropriate information for your database that you setup earlier as well as a random
hash salt.
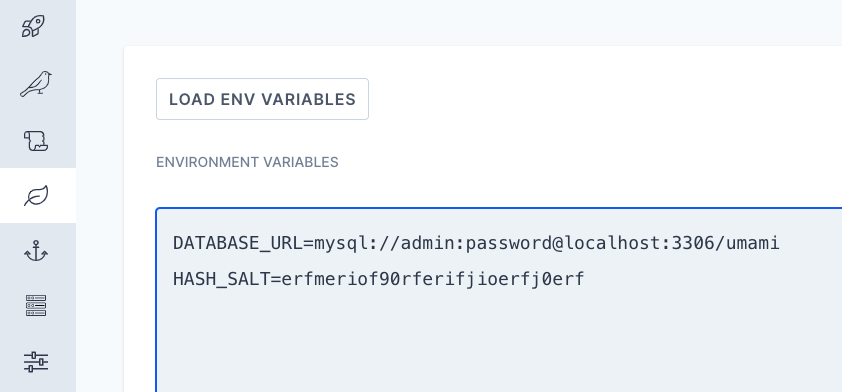
Click on Sync.
Create deployment hook
We'll also need to have a command ran to migrate the database tables. We'll use a deployment hook to achieve this.
Select Hooks and add a new hook.
Hook Name: migrate database
Hook:
cd {{ releasePath }}
mysql -u<db username> -p<db password> <dab name> < sql/schema.mysql.sql
Replace the <> accordingly with the database info. Take note that there is no space between -p and your password.
Click Update.
You can optionally choose to run the command via SSH if you wish.
Place the migrate database hook directly following the build assets hook.
Step 4: Deploy!
Once you have everything configured, deploy! 🚀
Select the URL for the site, and then enter the default user credentials:
Username: admin
Password: umami
Step 5: Optional if you went for option 2 in step 3 above
Set up a Personal Access Token (PAT) in Github
- Go to your github profile to Settings/Developer Settings/Personal access tokens and create a new token, provide it access to your repository and add the following repositiory permissions:
- read: Metadata
- read and write: Contents, Workflows
- Copy the secret!
- Go to the Settings tab in your forked Umami repository
- Click on "Secrets and variables" - Actions and add a new Repository secret by clicking on "New repository secret". Call it WORKFLOW_TOKEN and paste in the secret into the "value" field
Head over to the Code tab in your forked Umami repository.
Go into the .github/workflows directory and add a new file sync-to-fork.yml and add the following contents:
name: Sync Fork

on:
  workflow_dispatch:
  schedule:
  # check for updates every Sunday at 1a.m.
  - cron: "0 1 * * 0"

jobs:
  sync:
    runs-on: ubuntu-latest

    steps:
      - uses: actions/checkout@v4

      - name: Sync and merge upstream repository with your current repository
        # using dabreadman/sync-upstream-repo from the marketplace
        # You may pin to the exact commit or the version.
        # uses: dabreadman/sync-upstream-repo@fc5fe9952946b1daaafd9abd7fcd7e260b81ddbe
        uses: dabreadman/sync-upstream-repo@v1.3.0
        with:
          # URL of gitHub public upstream repo
          upstream_repo: "https://github.com/umami-software/umami.git"
          # Branch to merge from upstream (defaults to downstream branch)
          upstream_branch: "master"
          # Branch to merge into downstream
          downstream_branch: "master"
          # GitHub Bot token
          token: ${{ secrets.WORKFLOW_TOKEN }}
Commit the new file. This may start a deployment on Cleavr if GitHub Actions is enabled for the branch.
In the GitHub repo, go to the project's Actions tab and select the "Sync Fork" Action. Next, run the workflow.
This action will look for updates at your scheduled time (cron). Changes to the original repo will be synced and Cleavr will run a deployment.