NodeJS Deployments Troubleshooting
If your deployment has an error or you see a 502 Bad Gateway error when navigating to your website, then it could be that you have missed a step setting up your site/app or when deploying your web app.
The following are the most common reasons for 502 errors:
- PORT Address in code is hard coded
- Database connection not established
- Entry point or CWD paths not correctly defined
- Not using correct version of NodeJS
- Environment variables missing values or using incorrect values (be sure to triple check because it can be easy to miss)
Check the guides section to see if the app you are deploying has an associated guide. The guides will help you correctly deploy your apps.
Check the logs
Symptom(s): Site cannot be reached | 502 | Various issues
One of the first steps in troubleshooting is to look at the logs. If the site shows a 502 error, one of the best logs to look at is the PM2 log.
Here are the applicable logs to look at in Cleavr:
- Logs Report in the deployments section display web app specific logs
- PM2 Logs is typically the most helpful for 502 errors and can be found in:
- In the deployment details page, click View PM2 Logs
- In the server > logs > select PM2 Logs
- in the server > services > select Check Heartbeat for the version of NodeJS that's installed
- NGINX Logs show errors at the web server level and can be found in:
- In the server > logs > NGINX errors
- In the server > services > NGINX heartbeat
Site and app setup
Did you set up your port address?
Symptom(s): 502 Bad Gateway
Cleavr automatically assigns a port number when you create a new site. You can see the assigned port number by clicking site the info box. You may also designate a custom port for the app to run on when creating a new NodeJS app.
For many NodeJS frameworks, including NuxtJS, Cleavr is able to automatically assign the port to the app and successfully activate it.
Many framework's "Quick Start" applications will hard code the Port Number; often set to 3000. Typically, the port number is set in the index.js/ts,
server.js/ts, or main.js/ts files. Check where the port number is identified and update the code to look first to process.env.PORT.
For example, in a Nest JS app, you'd update the main.ts file as follows:
async function bootstrap() {
  const app = await NestFactory.create(AppModule);
  await app.listen(process.env.PORT || 3000);
}
To double check if your app is running on the correct port, first check the port Cleavr assigned your app. You find the assigned port in the Site Details.
Then, SSH into your server and run the following command:
sudo lsof -i -P -n | grep LISTEN
This will display all of the active ports. Check to see that your node app is running on the assigned port.
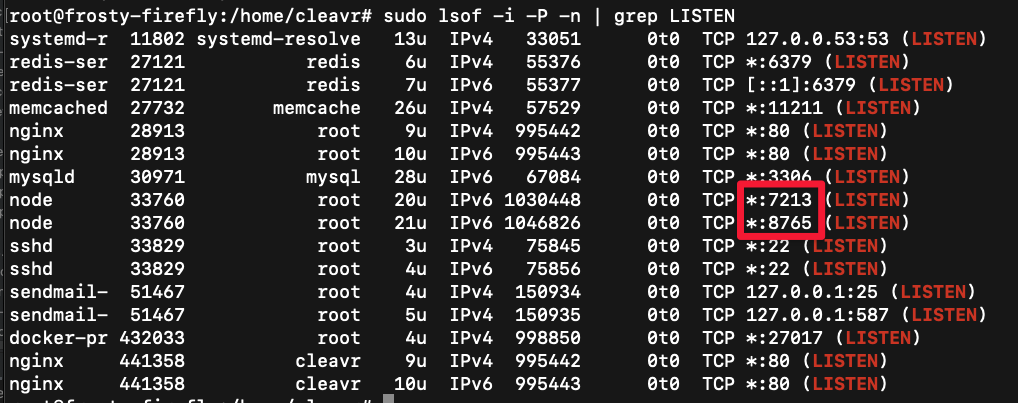
If the app is running on port 3000, you will need to update the Port Number to refer to the port assigned by Cleavr.
Did you designate the correct entry point?
Symptom(s): 502 Bad Gateway
For NodeJS apps, Cleavr defaults the entry point to index.js. However, this may not be the correct entry point for your app.
Common entry points for NodeJS:
index.jsserver.jsapp.js
For example, if your package.json file includes the following -
"scripts": { "start" : "node app.js" },
then, you will need to set the entry point as app.js.
The entry point is configured in the deployment workflow settings.
Cleavr also supports running start scripts. For example, if your package.json file contains the following -
"scripts": {
  "dev": "nuxt",
  "build": "nuxt build",
  "start": "nuxt start",
  "generate": "nuxt generate"
}
Then, you can simply add npm as the entry point and pass start as an argument.
Did you build production assets?
Symptom(s): Site cannot be reached
If you go to your website and your browser says something such as "This site can't be reached", as is the message that may appear in Chrome, then check to see if you need to build production assets.
Not all apps require production assets to be built. However, Cleavr adds a Build Assets deployment hook and disables it by default. If your app requires assets to be built, enable Build Assets in deployment workflow > deployment hooks and then re-deploy your app.
Did you set up a database?
Symptom(s): Site cannot be reached | 502 Error | Various issues
If an app has a database dependency and the database is not setup or is not correctly associated to your app, then it may appear the site is broken when visiting your website. For some frameworks, such as Strapi, this may result in a 502 error.
If your app requires a database, make sure you set up the correct database type, that you have added a database name, user, and password and that your app's database connection variables match how you setup your database.
Deployment step errors
The following are how you can troubleshooting common deployment step errors.
Check the deployment log for the failed deployment step
Each deployment step has a log that you can view to gain insight on the success or failure of the deployment step. If Cleavr encounters an error for any step, then Cleavr will automatically abort the deployment.
Deployment steps can typically fail for the following reasons:
- A dependency is not available - eg: Install NPM Packages deployment hook was not activated which result in Build Assets failing due to dependencies not being installed
- An app dependency defined in package.json is not available, misconfigured, missing, etc.
- A custom deployment hook was misconfigured
Does you app require a custom deployment hook?
Cleavr offers a list of common deployment hooks that satisfy deployments for the majority of NodeJS apps. However, you may have some unique needs or steps that need to occur during deployment for your app to successfully deploy.
Custom deployment hooks can be created and enabled in Cleavr to help cover your specific cases. In the workflow > deployment section, you can add new deployment hooks with custom scripts to run. You can then order the hooks to run in the required order. Refer to the deployment hooks section for more info on setting up and configuring custom deployment hooks.
Environment variables
There is an Environment section in the deployment workflow where you can add .env variables. However, you need to make sure that your NodeJS app is setup to
retrieve environment variables from a file.
If you use a dotenv then you may need to update it to make sure that, in production, it reads from .env and is not looking to PM2 environment variables.
const path = require("path");
require("dotenv").config({ path: path.join(__dirname, ".env") });
If the above is not an option for you, then you do have the ability to add environment variables to the PM2 startup script in deployment workflow > settings > build tab.
